My current HP computer wasn’t Windows 11 compatible so I needed to purchase a new one. I customized a model to add additional storage and RAM as well as pre-loading the stand-alone/no license version of Microsoft Office Home 2024.
I assumed it would have been customized here in the US, but that wasn’t the case. It ended up being assembled in Chonburi Thailand, south of Bangkok.
It was shipped via FedEx and the tracking was a fascinating lesson on air freight logistics.
Here is how it reached me:
Assembled/customized in Chonburi Thailand
Driven by FedEx vehicle 50 miles to the FedEx facility at the Bangkok airport
Flown from Bangkok Thailand to FedEx hub in Guangzhou China
Flown from Guangzhou China to Tokyo Narita
Flown from Tokyo Narita to Osaka Japan
Flown from Osaka Japan to Anchorage AK
2-day customs delay
Flown from Anchorage AK to Indianapolis IN
Flown from Indianapolis IN to Atlanta GA
Transferred to FedEx local facility in Alpharetta
Delivered
Quite amazing to see how international air freight actually works. If I only got frequent flyer miles for this!
I consider myself a decent amateur photographer. I’ve never had lesson, though I have read a lot online. I’m always flattered when people tell me how much they love my travel photos.
Just this week someone asked what kind of camera and lens(es) I use. My response was that, while I do have a nice fixed-lens digital camera (Canon SX70 HD), the majority of my travel photos are actually taken with my iPhone. Her response was, “My gosh, I would have thought you used a very expensive set up to take those gorgeous shots. They look professional. They’re amazing for being from an iPhone.”
The iPhone has an awesome camera and Apple continuously improves it. Currently I’m using an older model iPhone 11. Unless I need the zoom on my Canon SX70 (70X optical zoom) I’ve found the quality of the photos taken with my phone to be 10 times better.
So, what am I doing that you aren’t? I have no idea.
If you struggle with your phone camera I’d recommend searching online for tips and tricks articles for the iPhone camera (or for whatever model phone you have), including all those hidden features you never realized were there. There are dozens of articles. Any time Apple releases new iPhone camera features there are articles specific to the new functionality. You would be surprised how much you don’t know about your iPhone camera or how powerful the iPhone photo editor is.
Below are a few tips and tricks that I use. Hopefully these are beneficial to you out in the future:
1. Clean your lens. It’s easy to tell when your phone screen is covered with finger prints, dirt, greasy pizza, etc. Guess what? You lens is probably as bad or worse. CLEAN YOUR LENS before taking pictures. And please, use a soft cloth just like you would use for glasses. If you wear glasses you know how much better you can see if they are clean.
2. Protect your lens. That “glass” on your camera that you think is the lens is actually a plastic or polycarbonate shield to protect the lens. Treat it with care. If it gets scratched, your photos will never look good. These can be replaced, but it probably will take a professional and quite a few dollars to replace that lens protector. If you wear glasses you know just how horrible it is to see if your lenses are all scratched up.
3. Turn off the flash. The iPhone is fantastic in low light. I never use my flash. Have you ever noticed how indoor photos with a flash look weird? They always look weird to me.
4. Turn off Live. I just don’t care for the iPhone’s “live” function. It basically is taking a tiny video and just wastes memory.
5. Don’t “zoom”. When you use your fingers to “zoom in” you are really just cropping your photo “before the fact”. The more you zoom the more pixelated your photo becomes. Usually these look horrible in the end. If anything, skip the zoom, take the photo, and edit/crop it later. At least then you can see the before and after of the cropping and how it affects your photo.
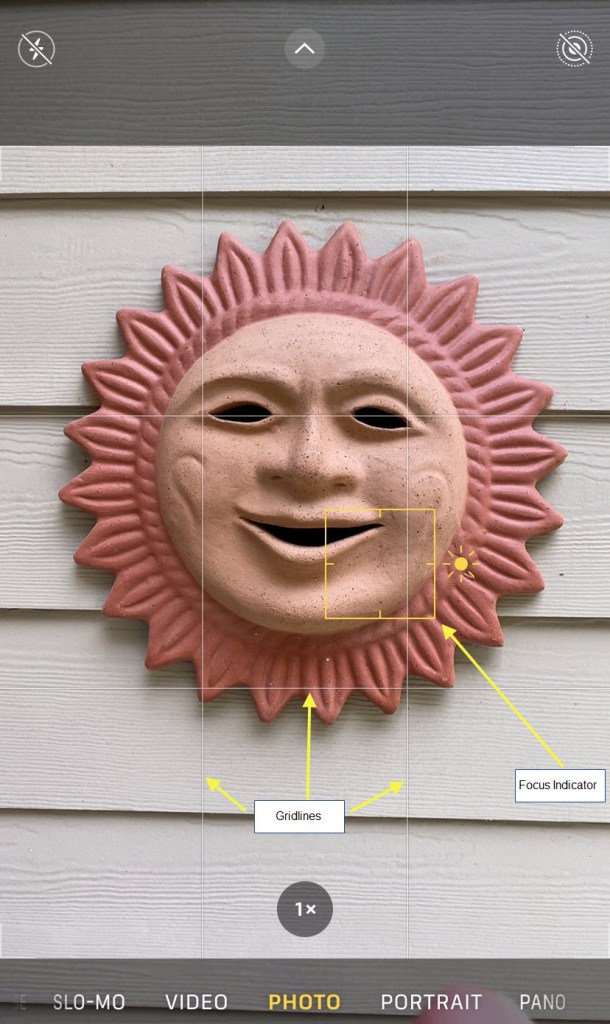
6. Don’t zoom – Part 2. Time and time again I see people taking a photo of something 10 or more feet away…and they pinch zoom in! Sometimes it’s a flower they can place their phone inches away from yet they stand several feet away and “zoom”. Why do they do this? It just drives me nuts. Unless there is an obstacle in the way just walk closer and take your photo close up. When taking close up photos the focus often comes in handy (see Focus below). Here is a photo taken with a now-antique iPhone 4 back in 2014. I was maybe 8 inches away and used the focus. It was taken as a Home Depot garden center! Ha!
7. Take photos or videos in landscape. Certainly phones and apps are designed for portrait (tall) photos, but taking them that way loses so much of what you might want to photograph. In landscape you might be able to get the full building, but in portrait you only get half or the middle of a building. When you visit media/news website you will rarely, if ever, see many photos taken in portrait (as opposed to the iPhone’s “portrait mode” which focuses on a person and blurs the background). When editing a landscape photo on your phone, turn the phone landscape and edit where it fills the full screen (see Edit your photos below).
8. Focus. Yes your iPhone camera does offer the ability to focus. Usually it isn’t needed, but often for close up shots it very helpful. Just press your finger on the screen where you want to focus and a yellow box will appear. The phone is then focusing where that box is. You will also notice in this portrait (to help me screenshot) photo I also have light gray gridlines turned on which helps to have level (or not so level) photos. Some may find them annoying but I’m used to them now. Gridlines are turned on in Settings > Camera > Grid
9. Panorama photos. Breaking my landscape/portrait rule, when taking a panorama you should always hold your phone upright. The wider the panorama the shorter the photo. If you start holding your phone in landscape you will end up with a very short very long photo that is useless. Don’t overdo it; a good panorama isn’t too wide. Below is my kind of panorama photo, taken in a balloon over the sand dunes in Sossusvlei, Namibia. This was taken with a now-antique iPhone 5s in 2015.
10. Edit your photos. The iPhone photo editor works great. In your camera roll just pull up a photo and click Edit. I often just use “Auto” though sometimes need to adjust other settings. The various edit options take time and practice to figure out. The good thing is you can always “Revert” to the original photo and start over. Always edit indoors or in the shade. If there is glare on your screen your edit might look good then, but indoors it might look awful. I have an iPad and much prefer to edit on the “big screen”. I’ll Airdrop photos from my phone to the iPad and edit there. Doing this gets you a much better final product and more precise cropping and straightening (yes, your iPhone editor can “straighten” a crooked photo…within limits).
11. Photos of people in front of something (building, mountain, monument, etc.). I’m anal in that when taking photos of people I actually want to see the people as well as including things in the background. I hate photos people taken from so far away that you can see the landmark, or whatever, but the person is just a tiny speck.
Also, if you are taking a photo of someone in front of a pointed object DON’T have that object coming out of the top of the person’s head. Offset the shot a little. Too many people return from Pisa Italy with dozens of photos of them in front of the leaning tower with the top of the tower popping out of their head like they’re wearing a wedding cake hat. Not me. Note: I spent 5 minutes trying to explain to my friends what I was after in this pic. Here though the sun wasn’t just right making this photo a bit mediocre in my mind. I was in the shade, but the background in the sun. You can’t walk on the grass there so sometimes have to do the best you can (the keep off the grass sign is also visible in the photo – oof).
12. Where is the sun? Always remember if the sun is in your eyes when you’re taking a photo chances are it won’t look good. If you can find/make shade to get your lens out of the sun the photo will always look better. When taking photos of people the sun should always be in their eyes, not yours. If the sun is at the persons back the background will look good and the persons face will nearly be unrecognizable. If you are traveling stick to photos of people taken when the sun is in their face.
13. Take multiple shots. You may never get back to the place you are photographing. If there is something you really want to preserve forever take multiple shots and at different angles (see Composition). Later on DELETE the bad ones and keep only the very best. I’ve been known to take 20+ photos of a place and keep 2. If you post on social media try to avoid posting 10 shots of the same thing. Pick one and add 9 others to go with it.
14. Composition. I’m a work in progress and constantly learning to improve my shots. Here again, search the web for “photo composition”. There are hundreds of free websites with examples of how to better compose your photos. You would be amazed what a difference it will make.
Now get out there and start taking better photos with your iPhone.
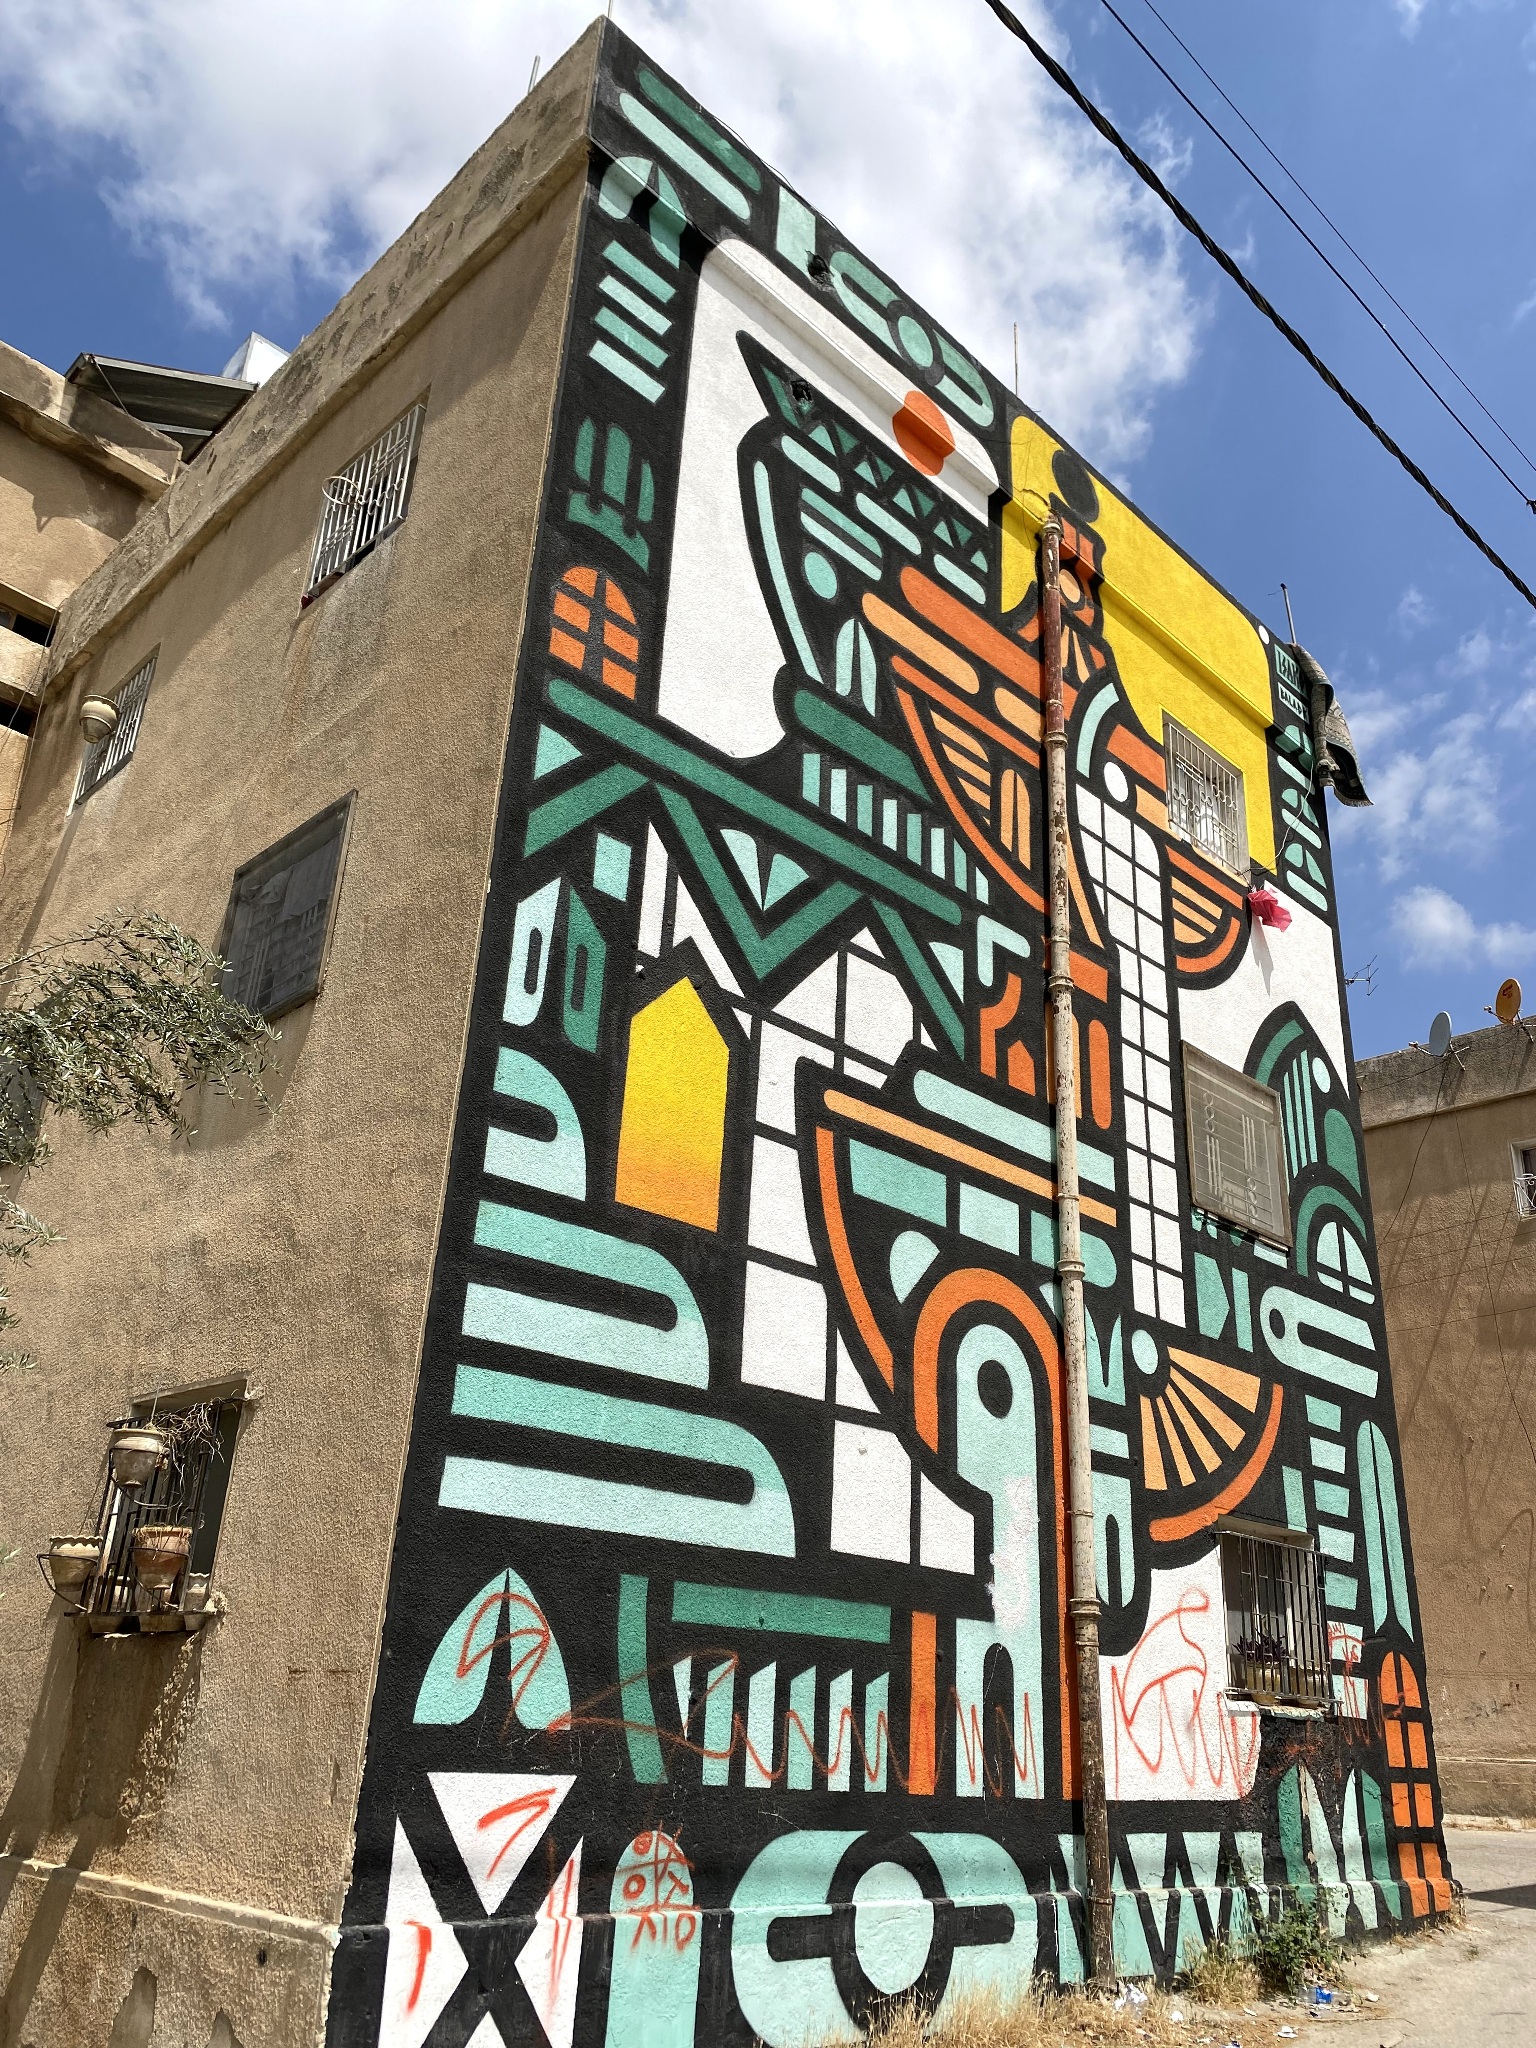
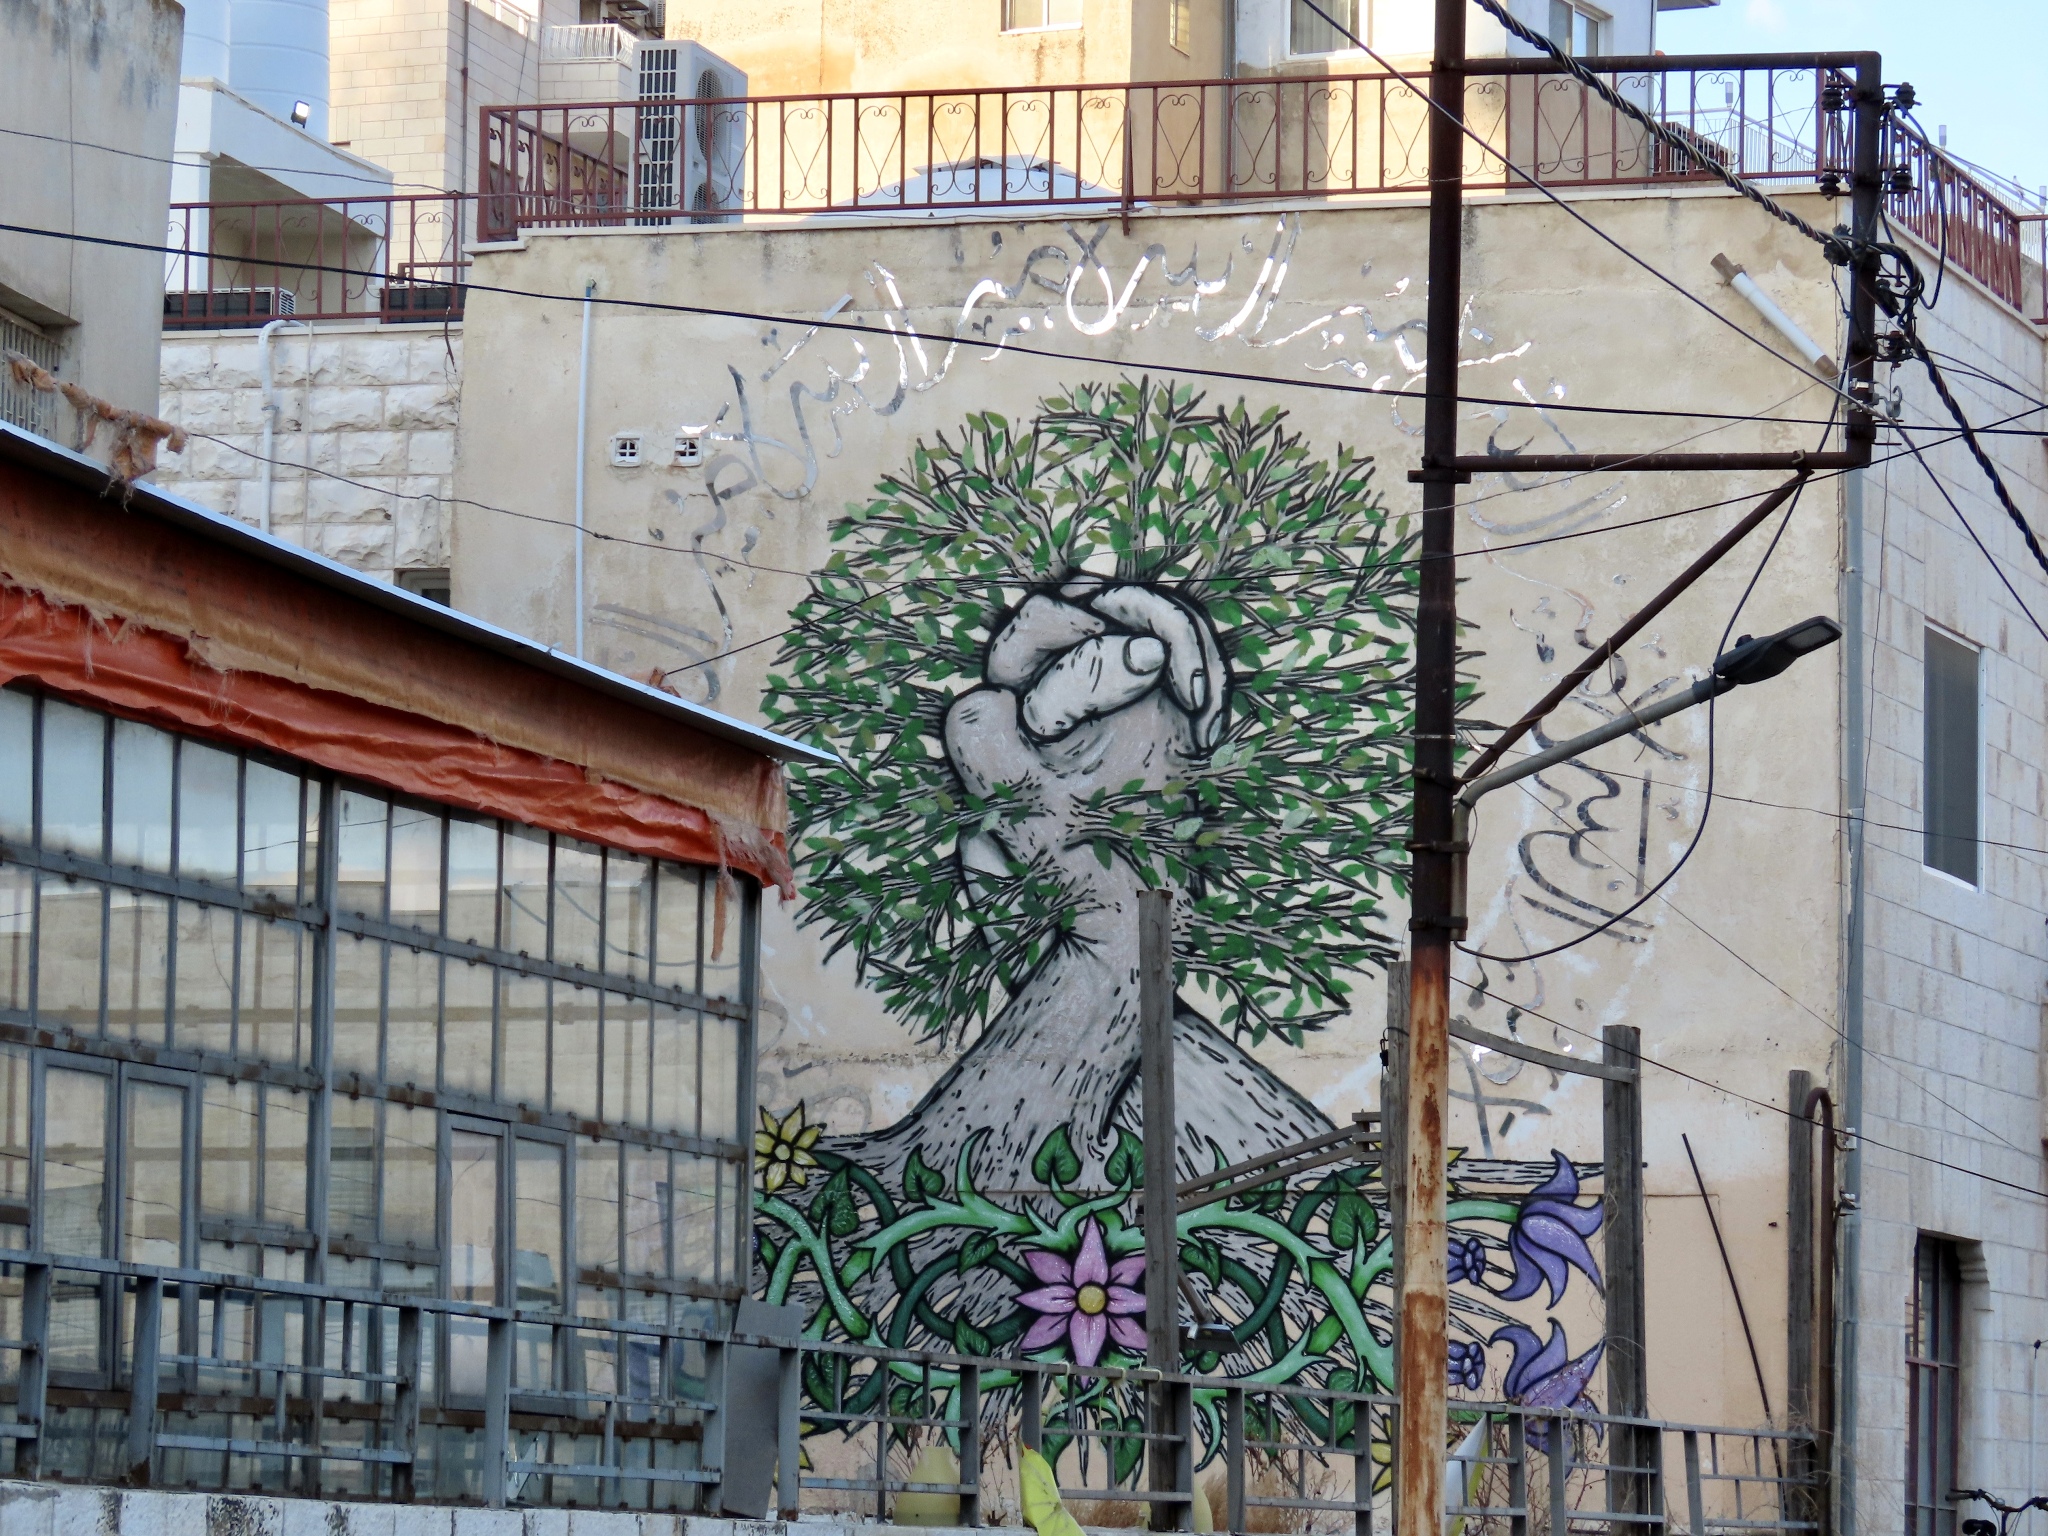
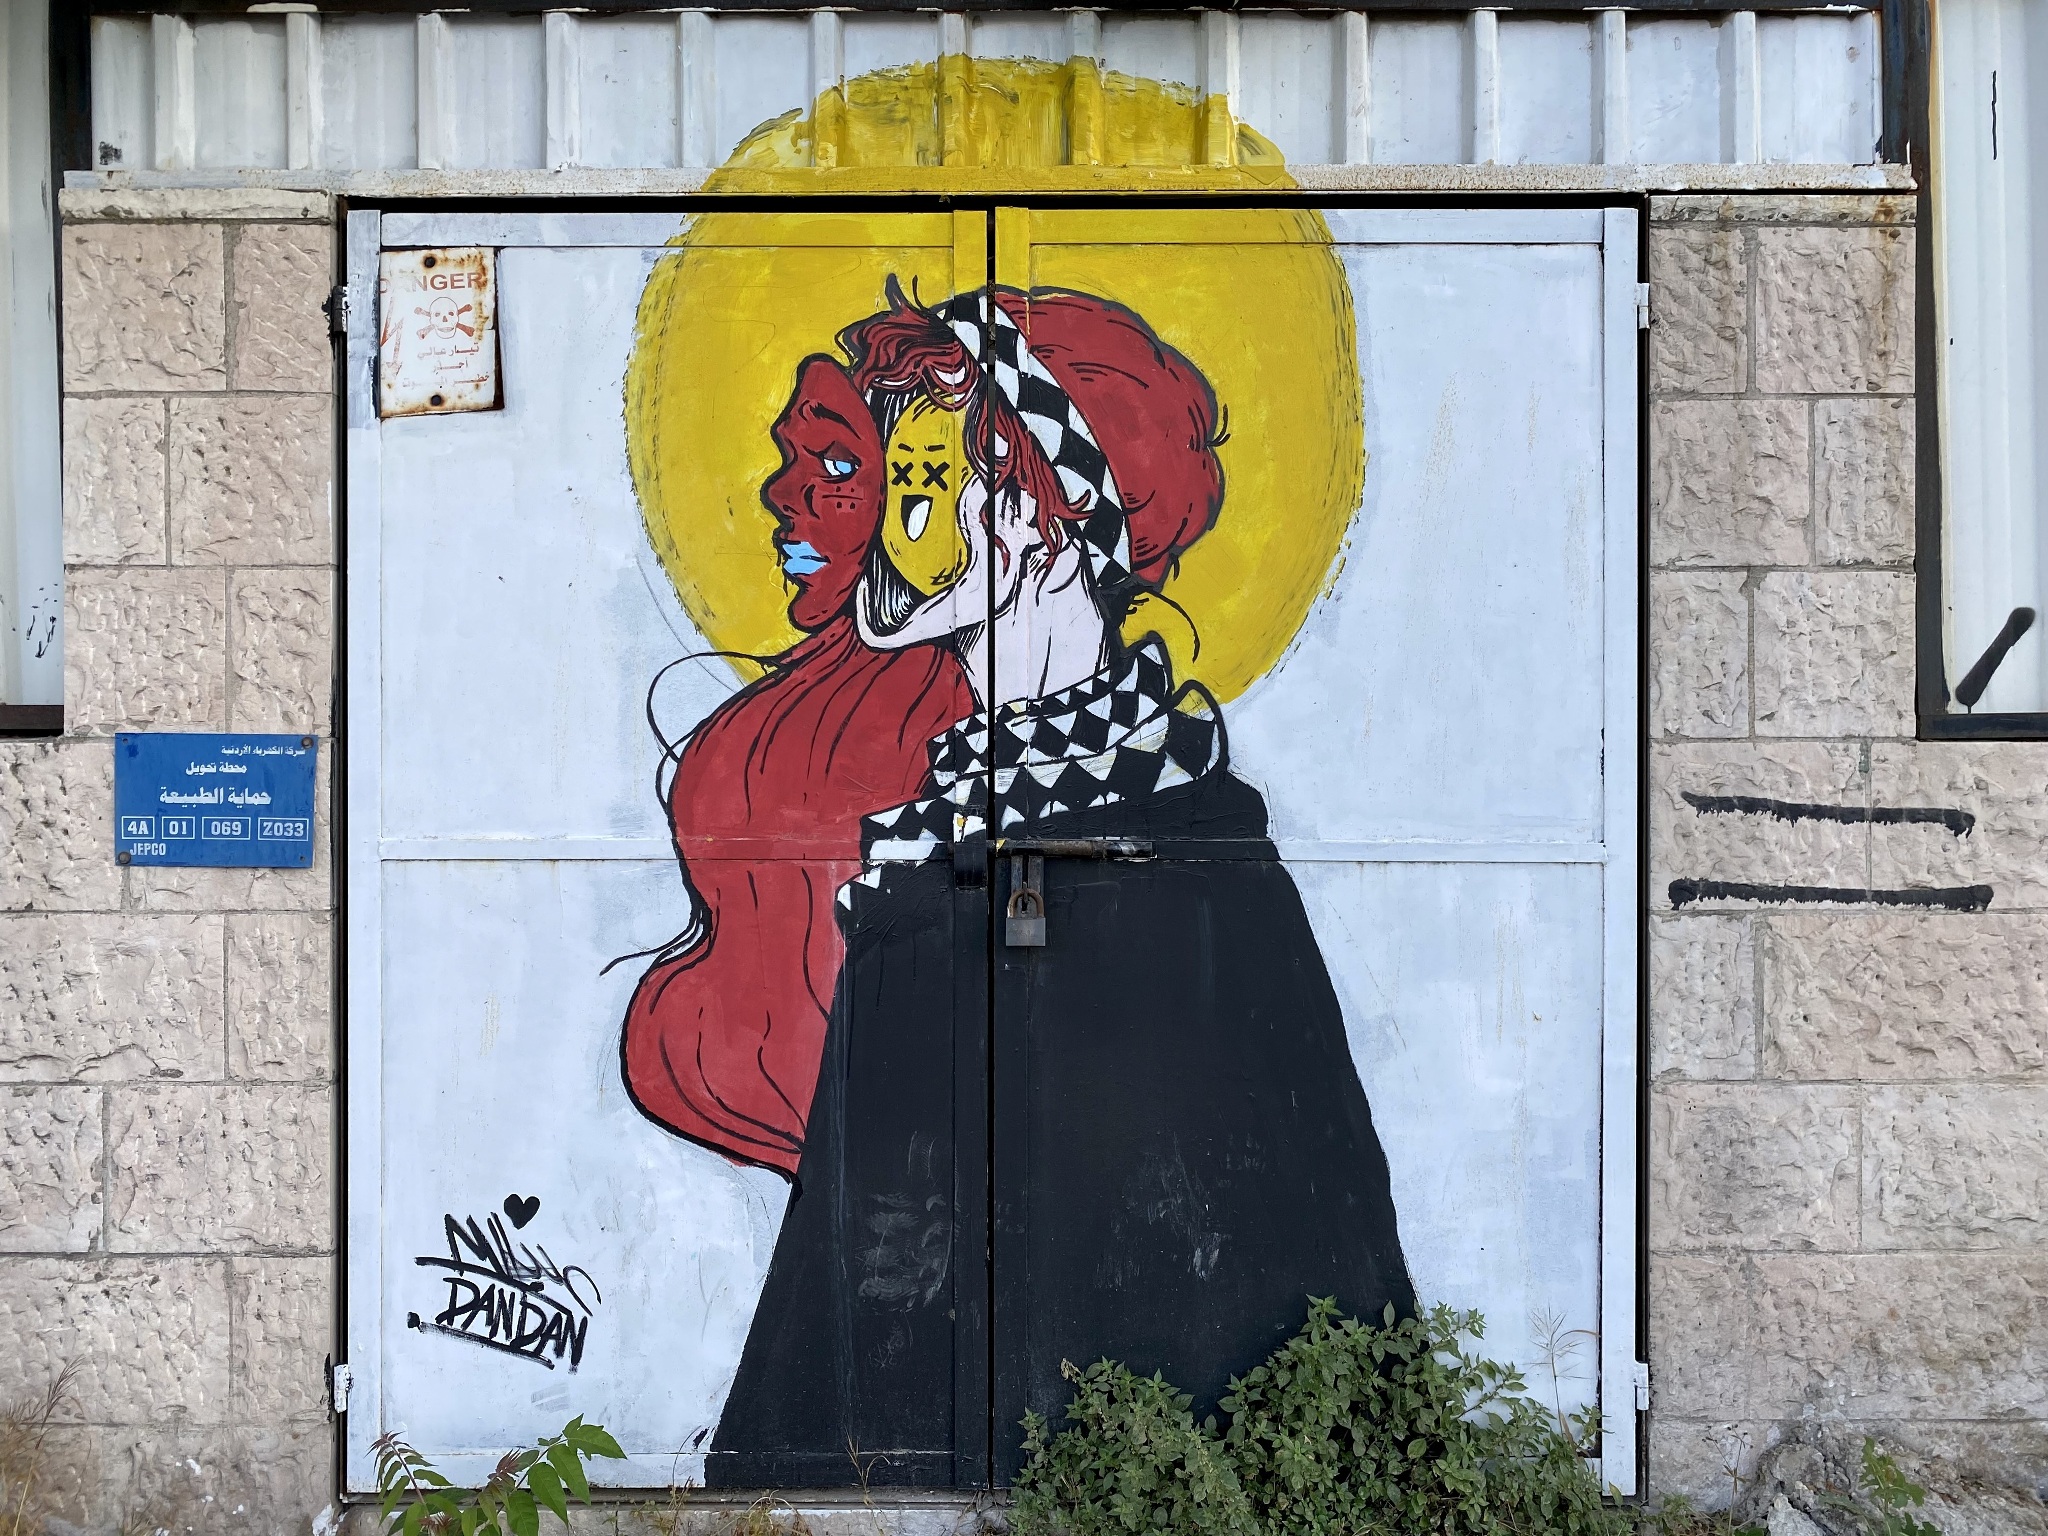
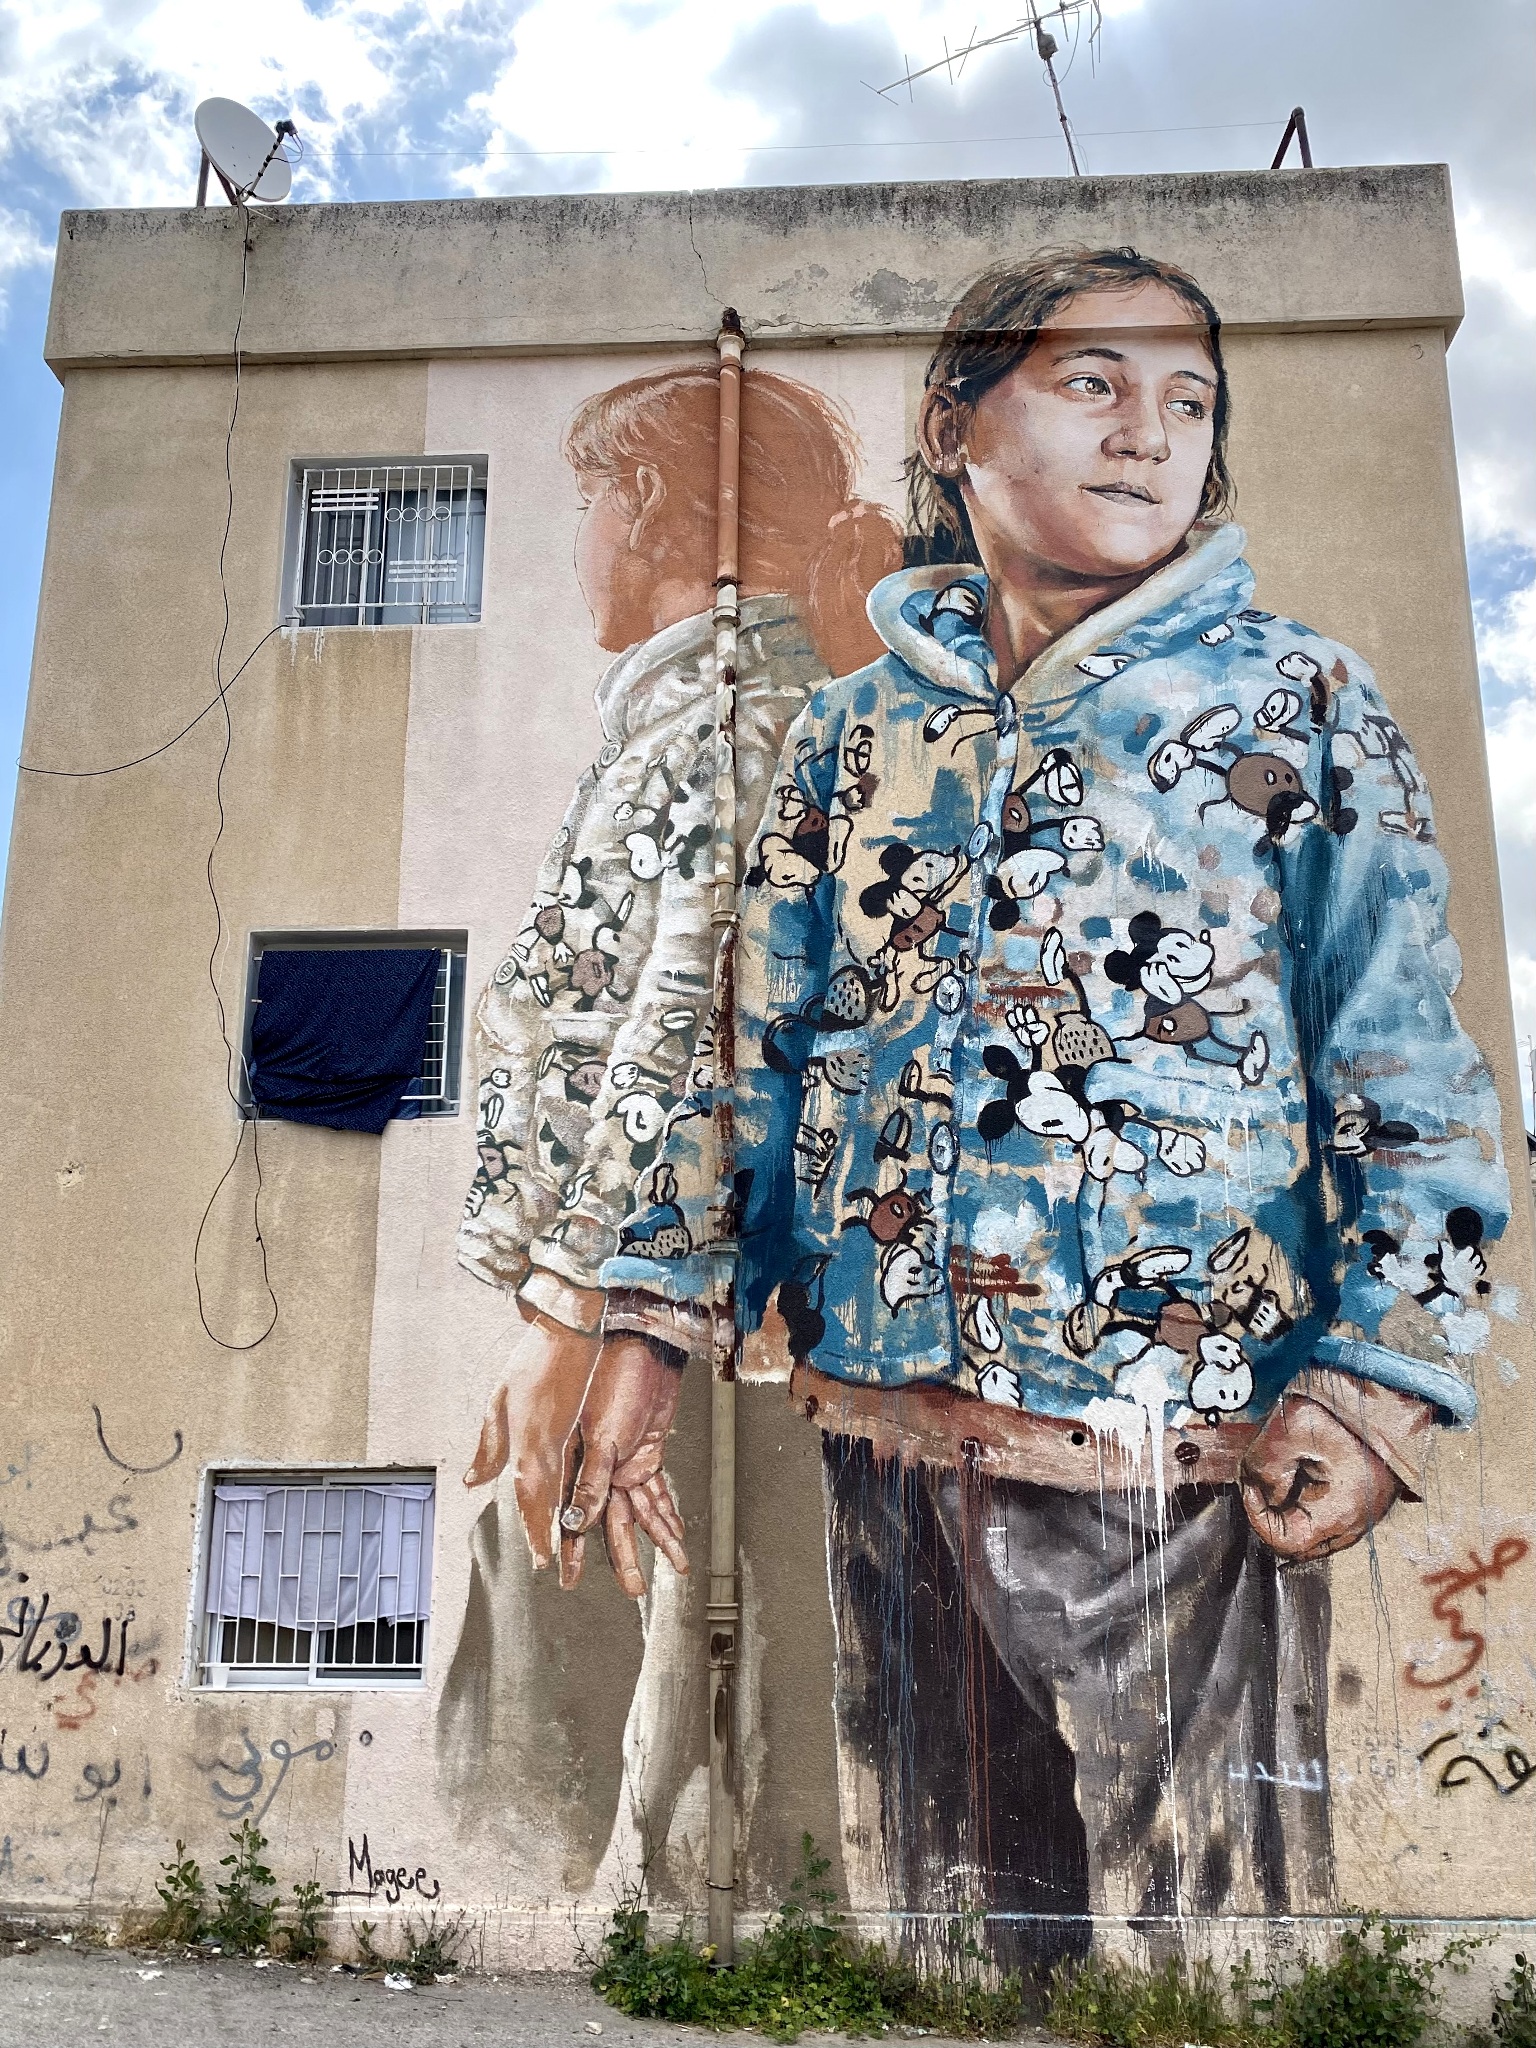
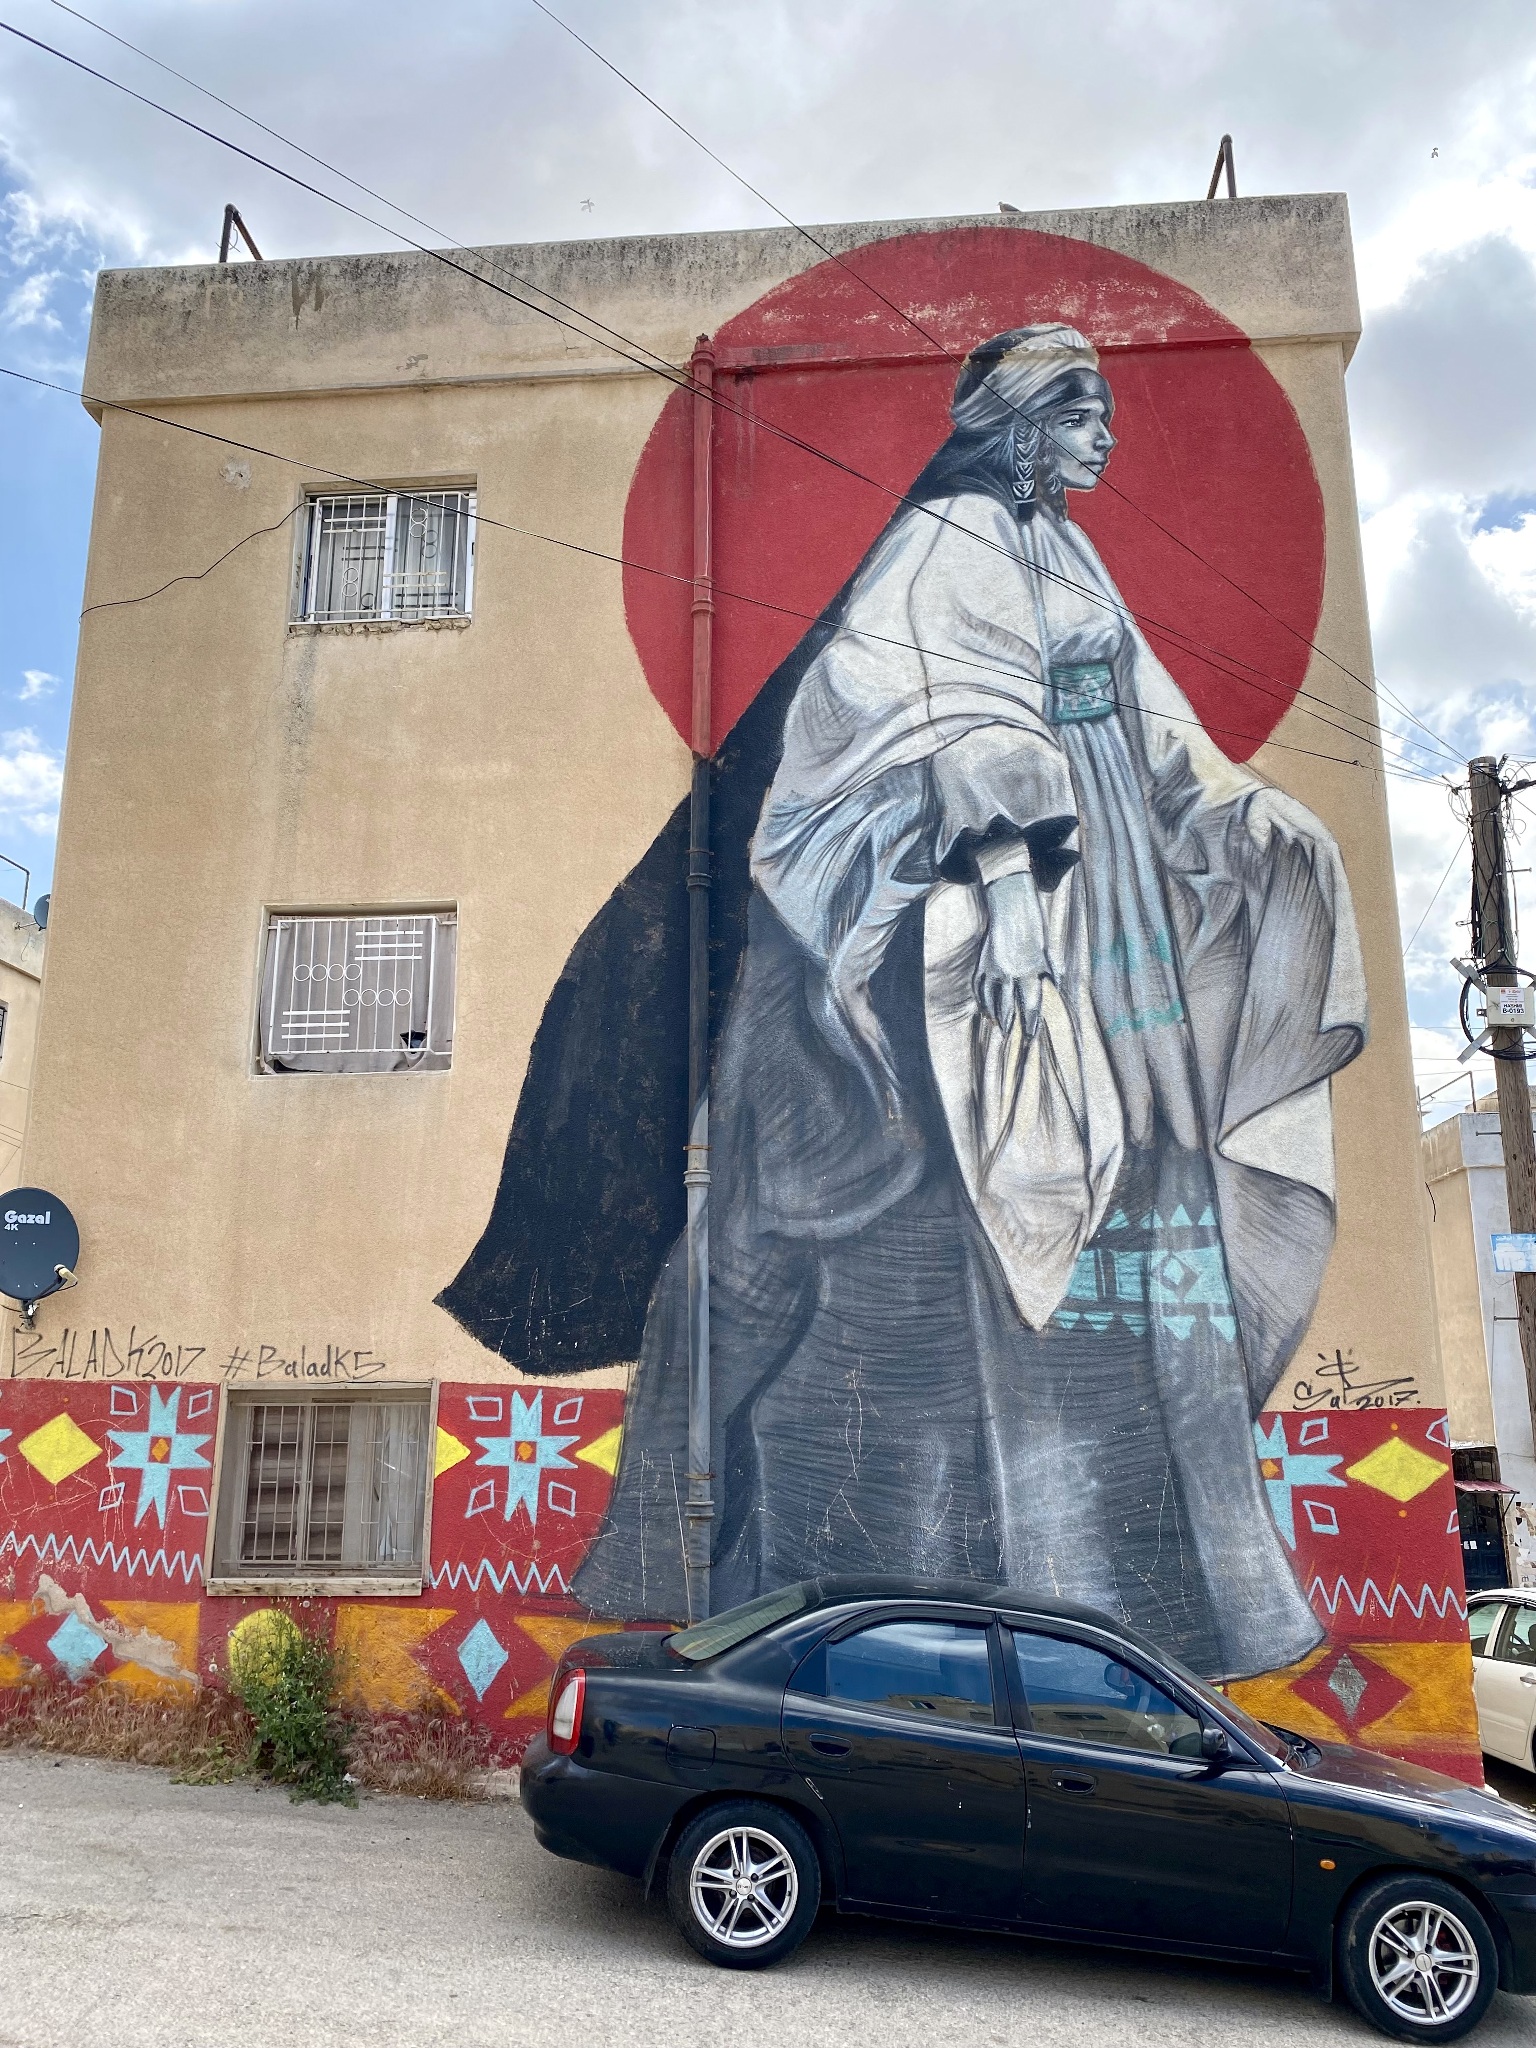
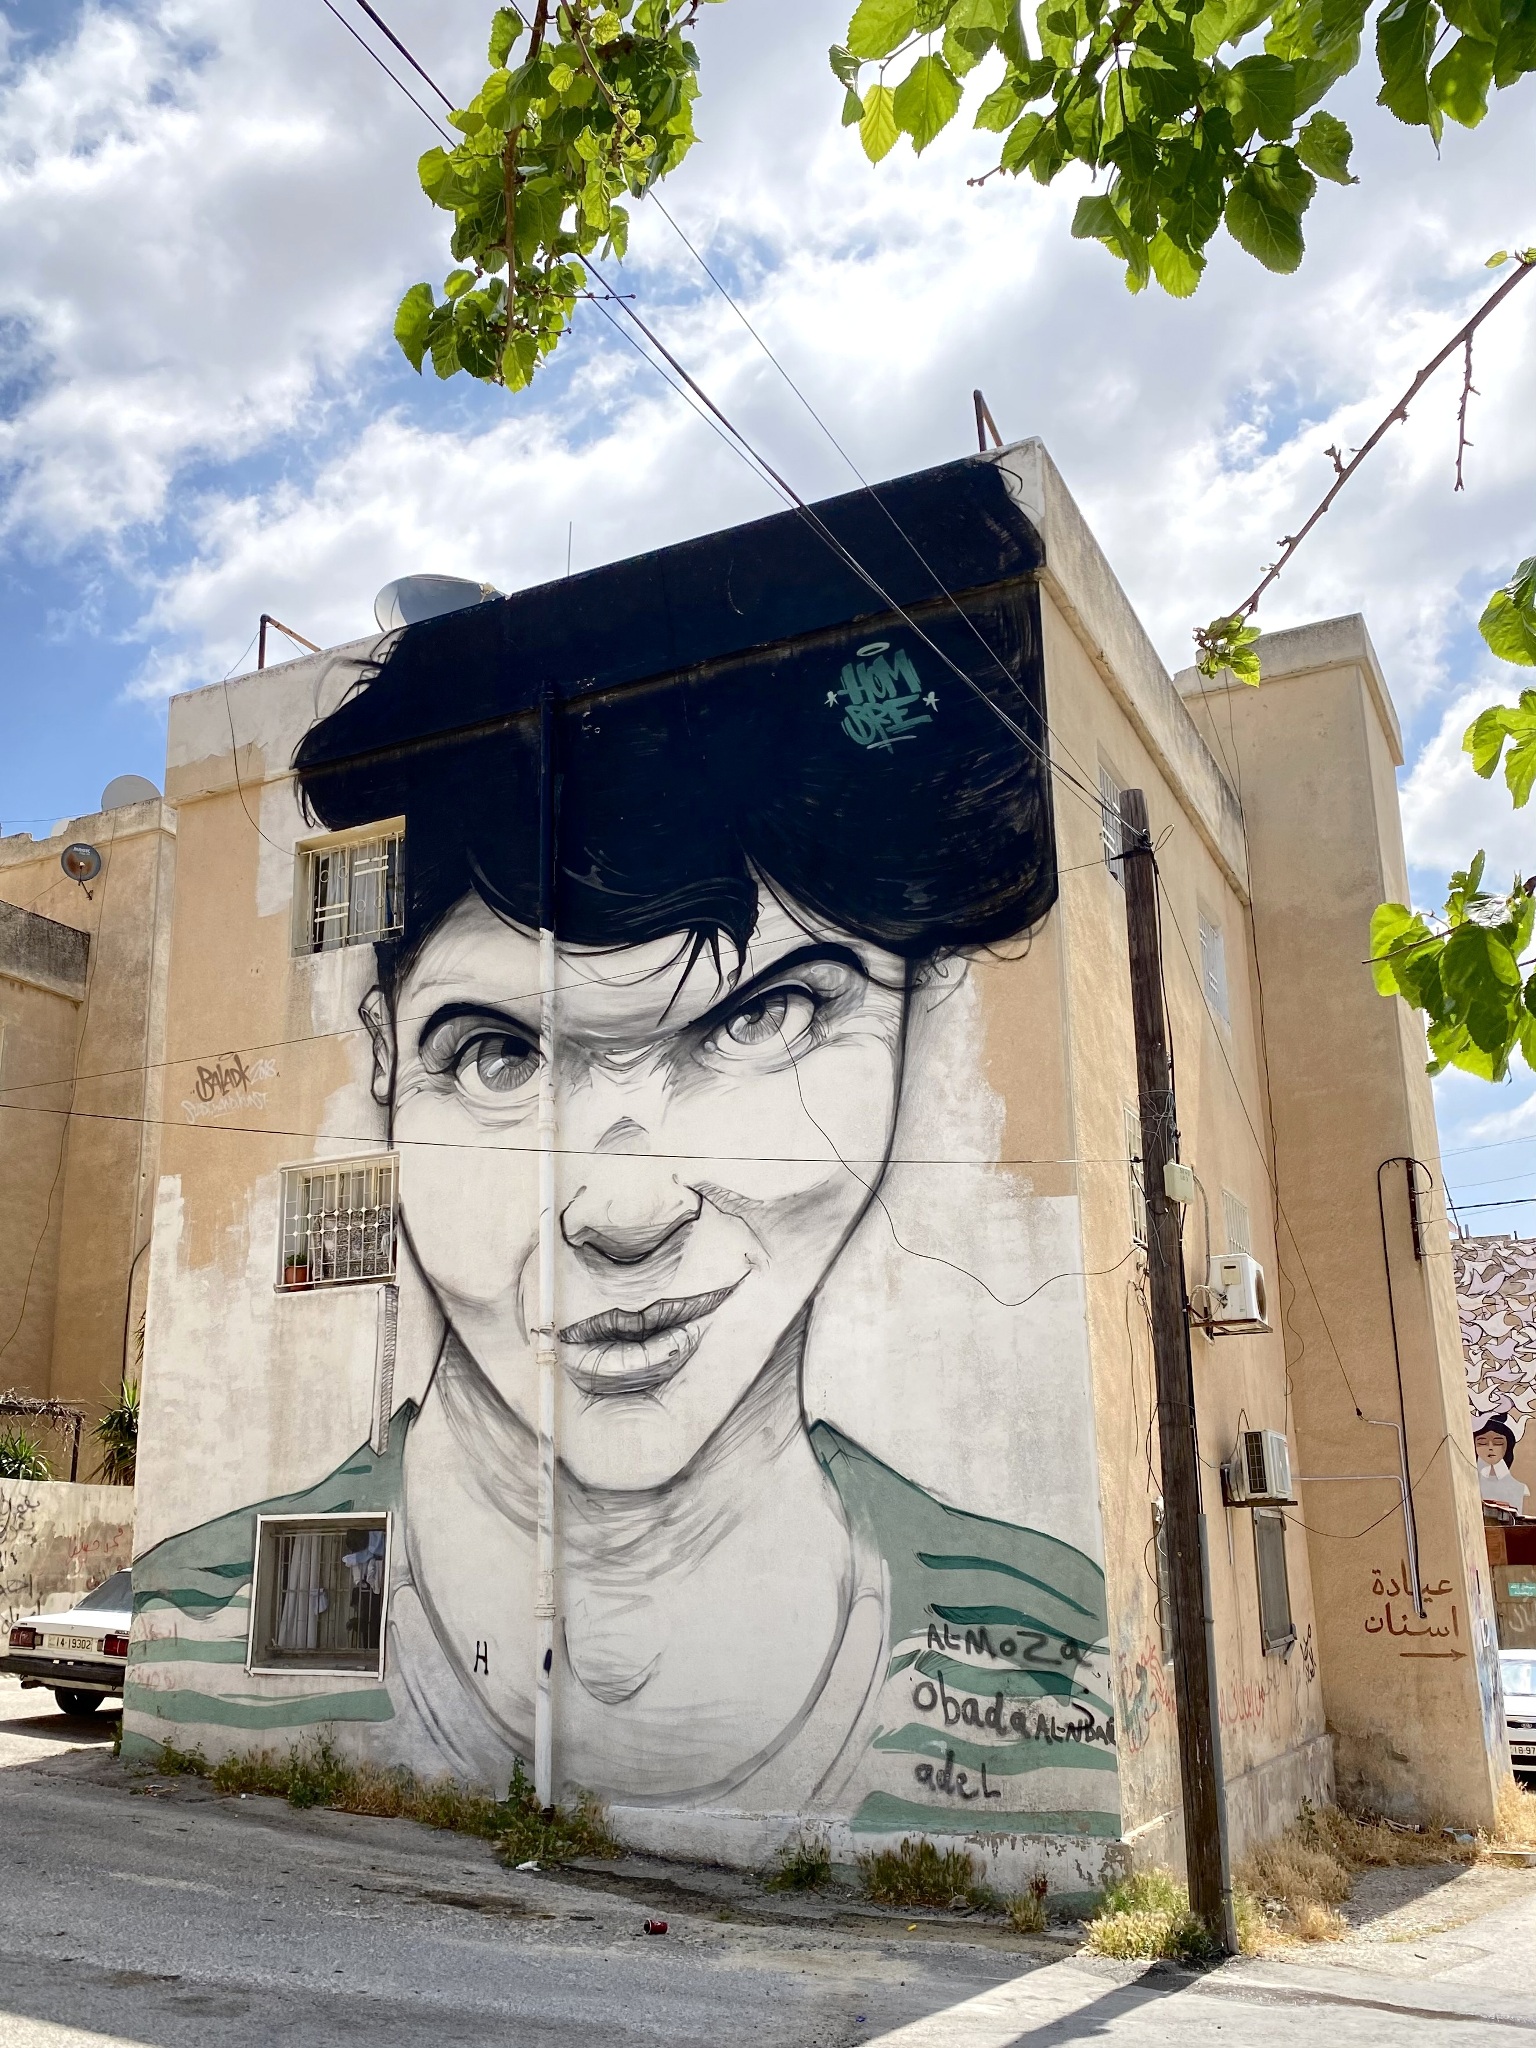
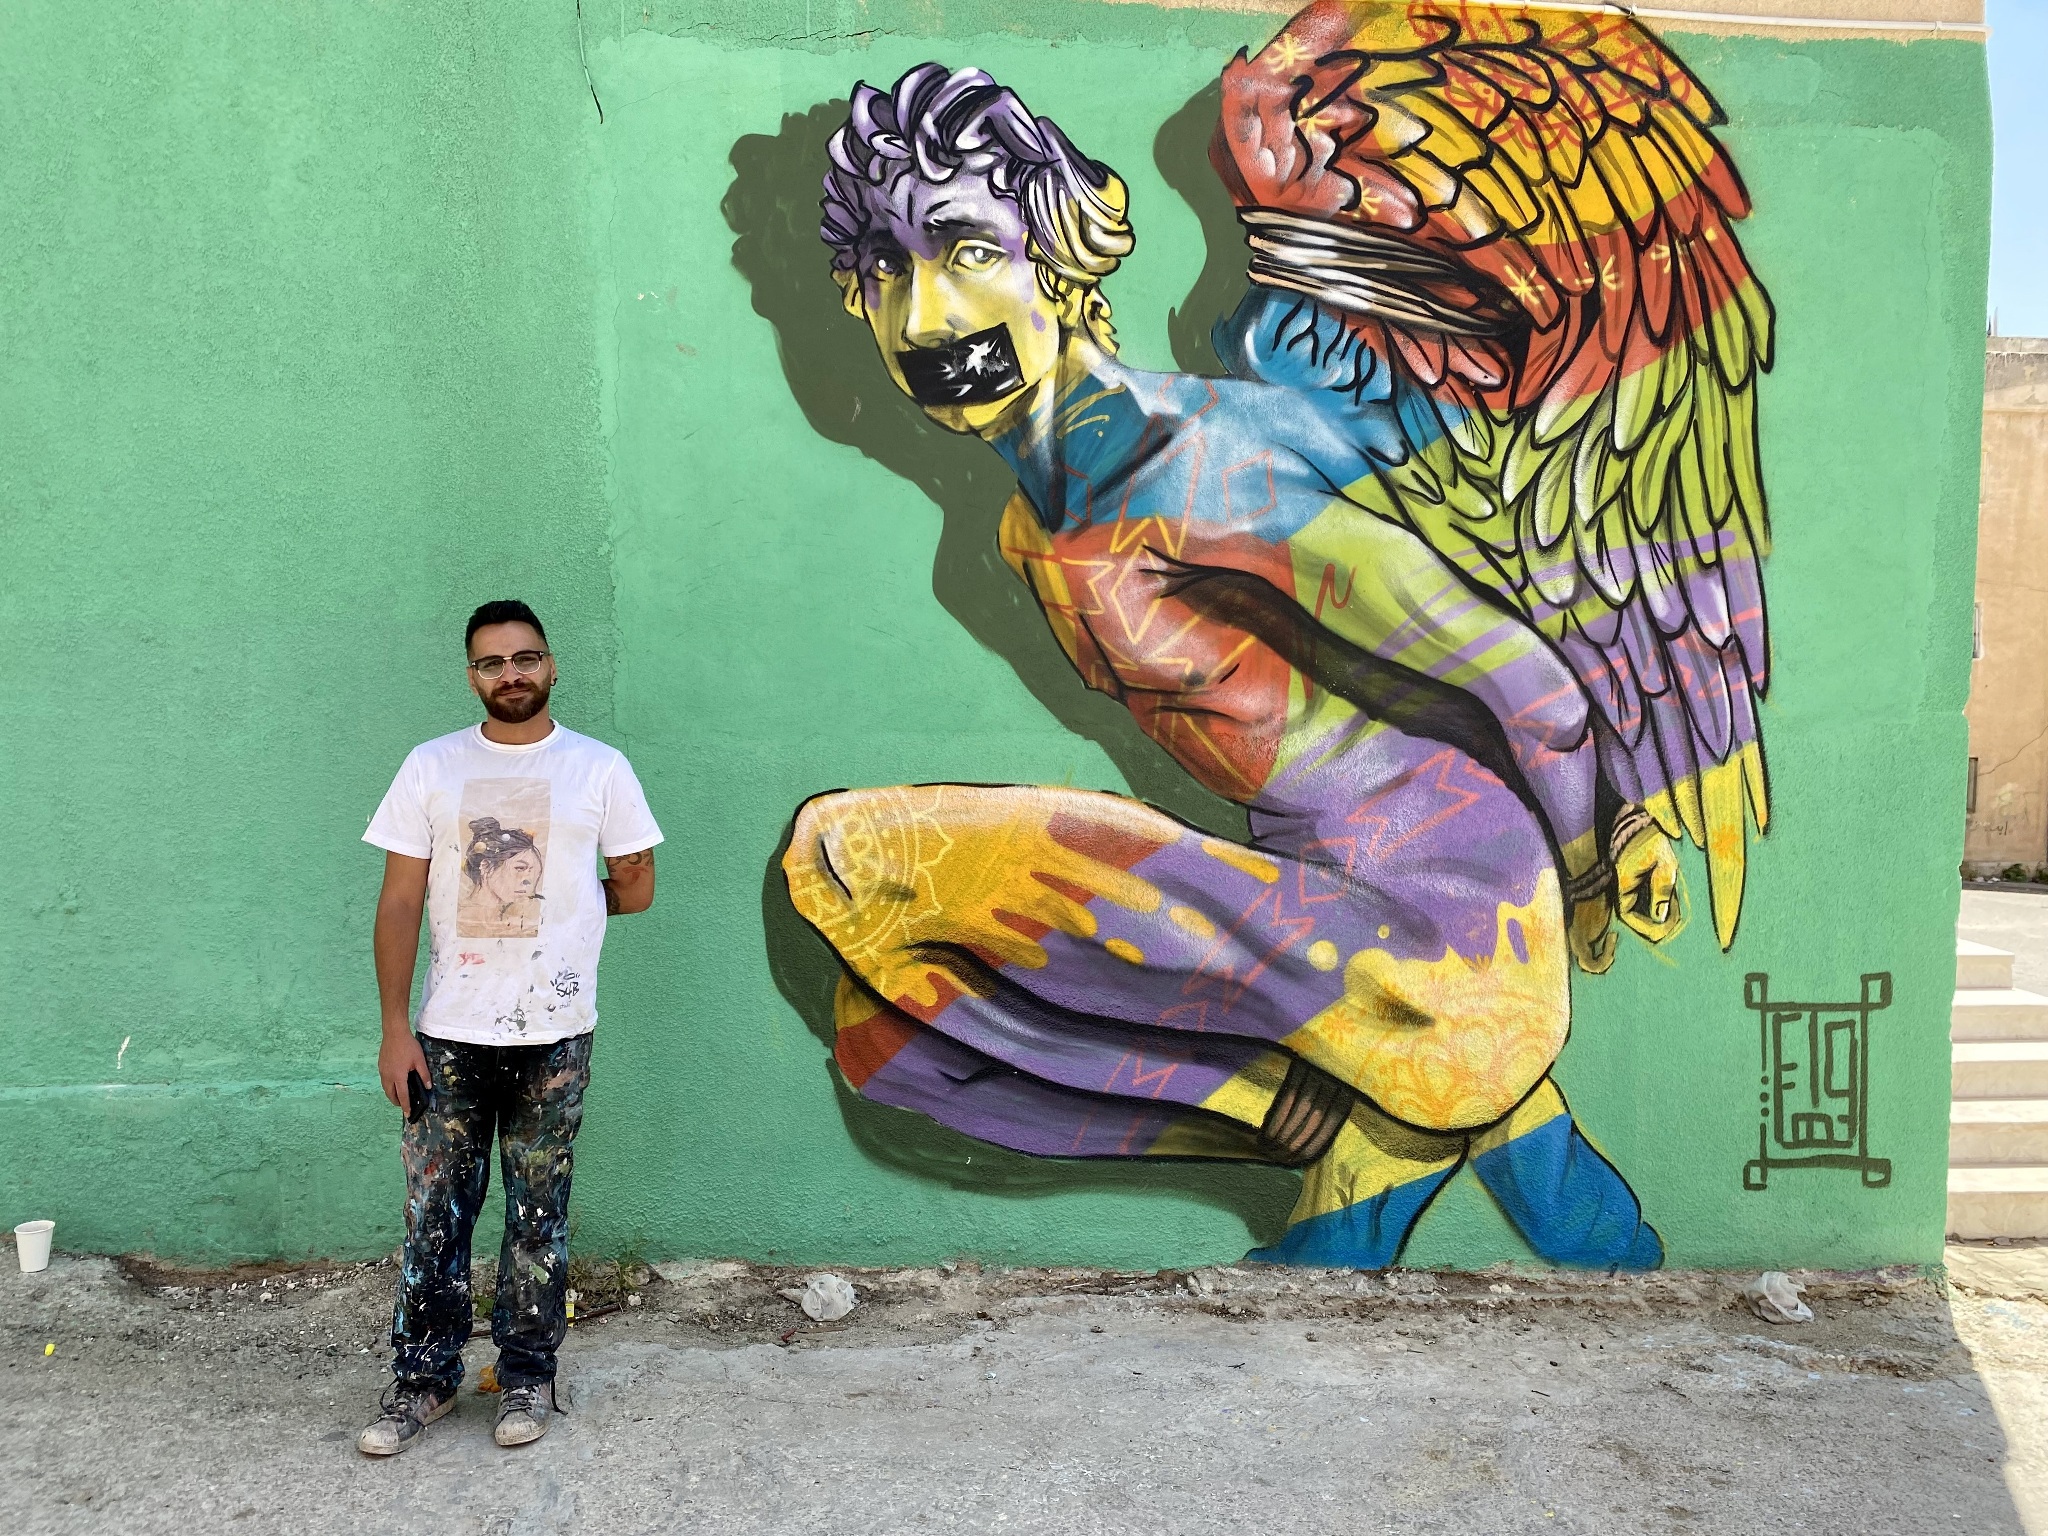
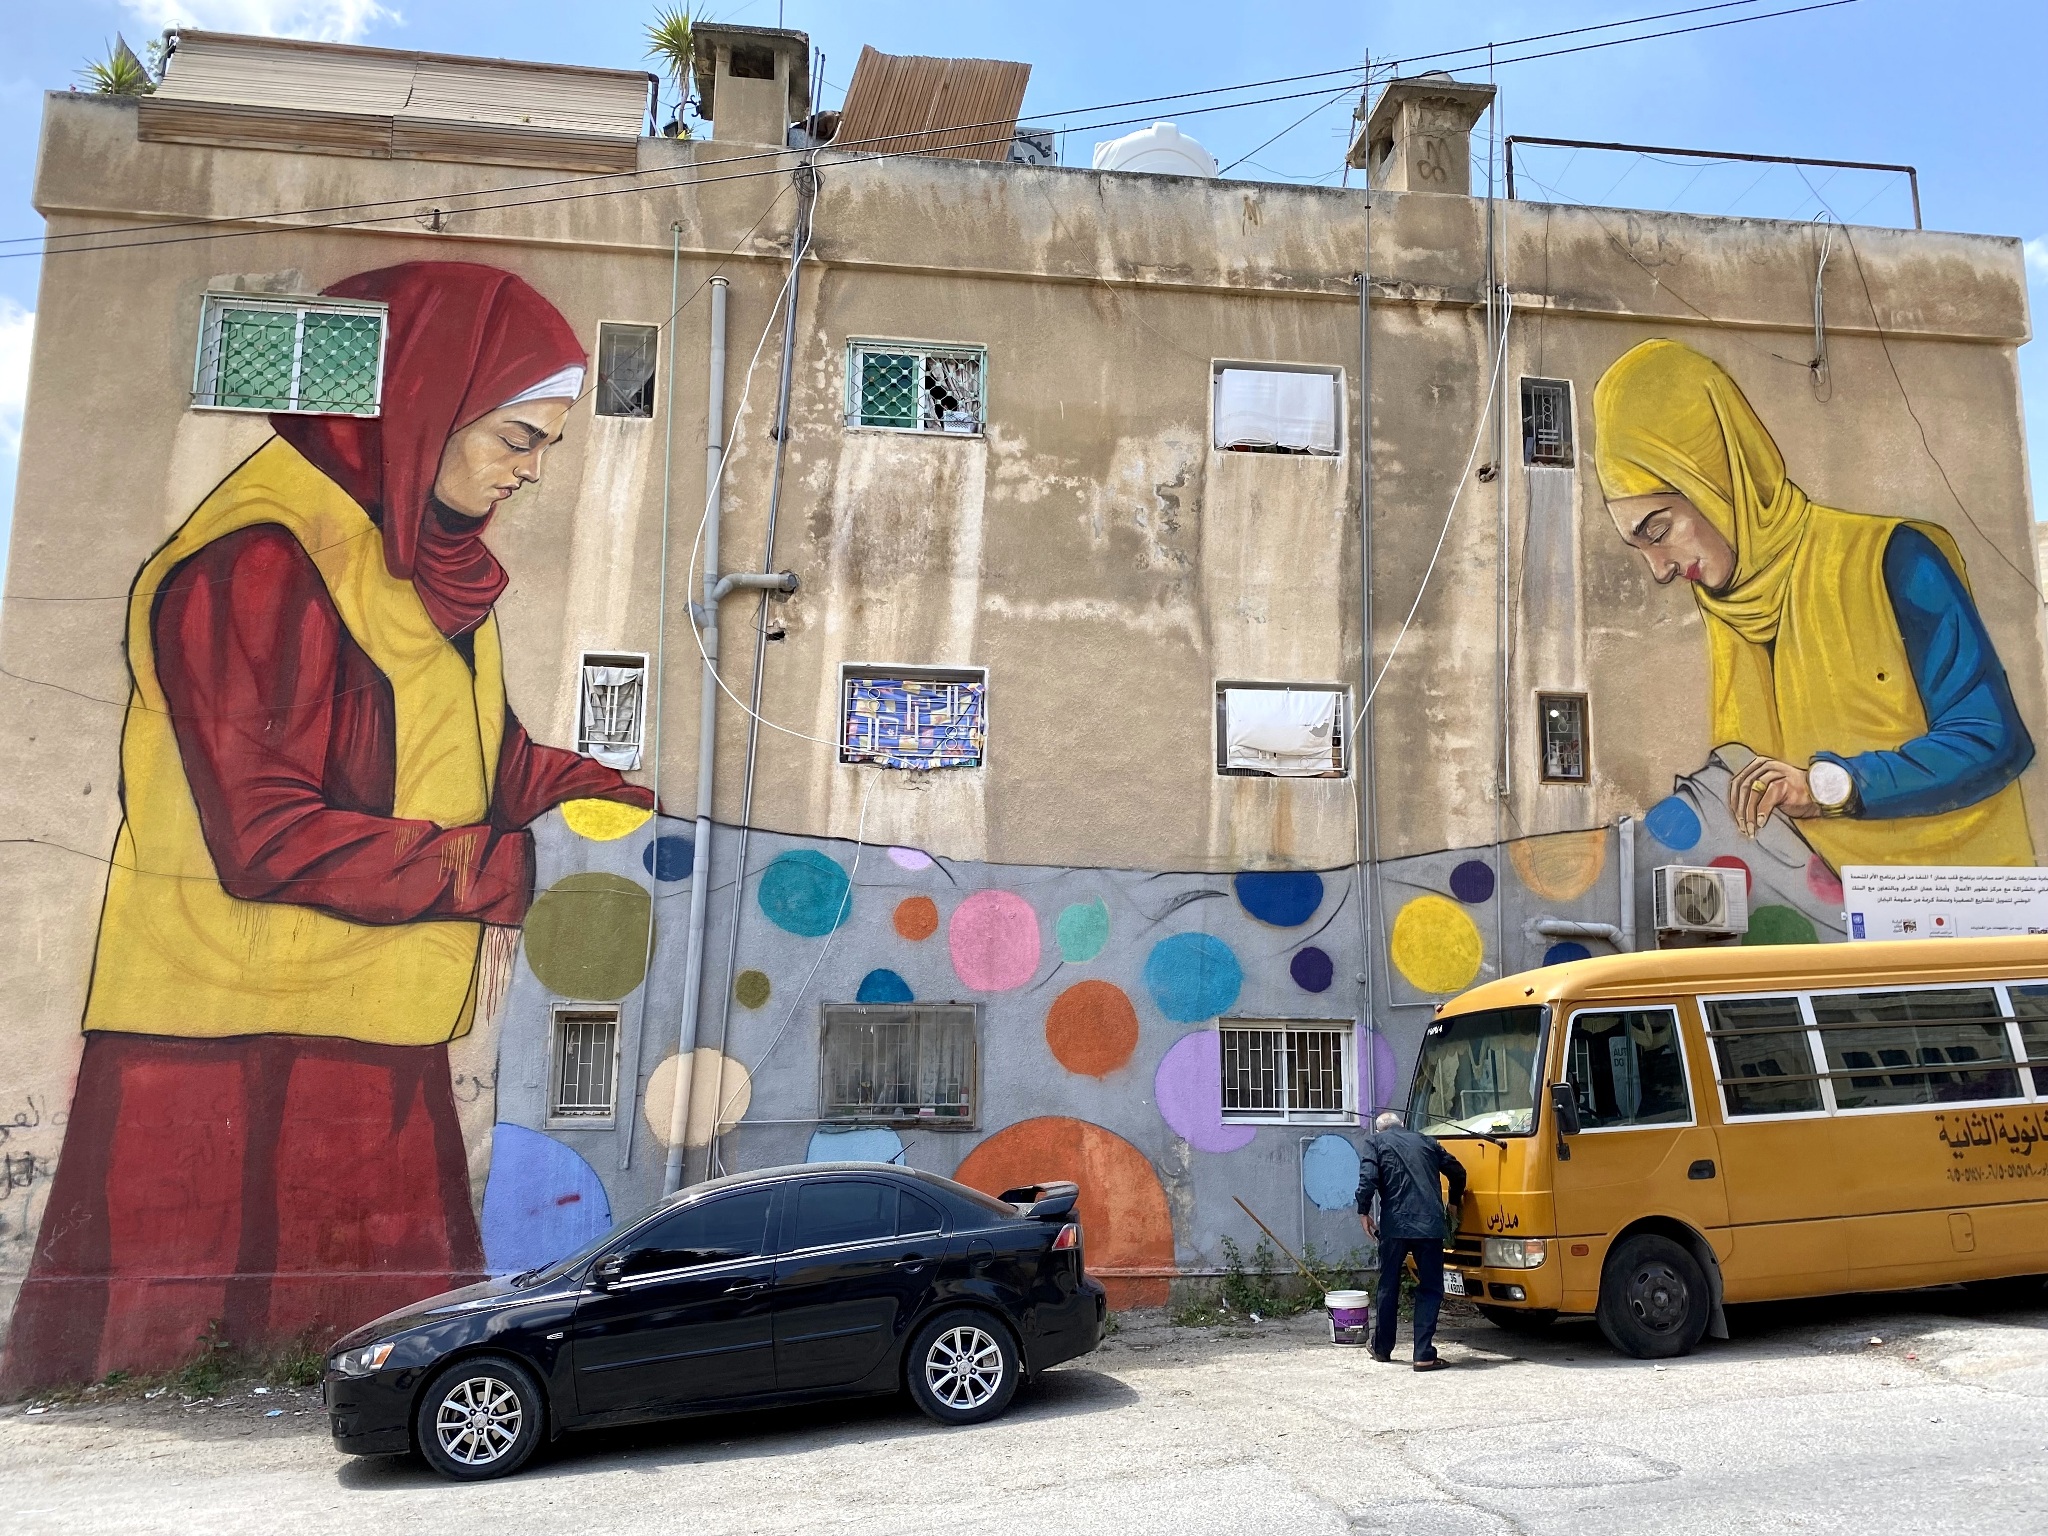
On my trip to Jordan in May 2022 I arrived a few days before my tour was scheduled to begin. This was partly to recover from jet lag, but I also wanted to take a couple of street art tours in Amman.
I joined a local company called Underground Amman and took their downtown tour my first afternoon and a tour in the working-class neighborhood of Hashmi Il-Shamalia neighborhood away from the city center the next morning. These tours certainly didn’t disappoint. The guide we had provided background about several of the murals. An interesting thing I learned was that in Jordan the majority of the artists creating the large murals were women.
The downtown tour started fairly close to my Amman hotel though ended a bit away. To get back to the hotel I used Uber which worked great.
For the Hashmi Il-Shamalia I took an Uber there. While on our tour we actually met one of the local artists who happened to be there to do an adjustment to a mural he had just completed. It was very interesting to speak with him. At the end of the tour he gave me, a couple other people on the tour and the guide a ride in his car back to downtown Amman. From there it was a shorter Uber back to the hotel.
I’m looking forward to my next mural tour…wherever that may be.
Dave Taft has left the building (or home office that is). After 23 fantastic years today was my final day with Siemens. So excited to see what this retirement thing is all about. And so, my next great adventure begins…
I’m so thrilled to be fully vaccinated against Covid-19 and hope everyone will get theirs as soon as humanly possible. We can beat this pandemic but all have to work together to make it happen. Please do your part. Vaccinations save lives…not just yours, but those around you.
On my 2019 Christmas trip I wandered through the Barranco and Miraflores neighborhoods of Lima, Peru in search of murals and street art. They were everywhere and I wasn’t disappointed.
I was fortunate to be in Brixen Italy during their Water Light Festival. The festival ran from May 9 – 25, 2019 and each night from 9 – 12 PM there were various displays throughout the city center. While they had a map, they also strung green fiber cable above the streets that you could follow from display to display. The highlight were the colorful flying fish that moved to music in front of the Brixen Cathedral.
On my recent trip to Glasgow I spent some time wandering the city to look at the wonderful murals they have. Here is a selection covering many of them.
Hasbro has trademarked the scent of Play-Doh: “a sweet, slightly musky, vanilla fragrance, with slight overtones of cherry, combined with the smell of a salted, wheat-based dough”. I wonder if a Play-Doh fragrance is in the works? 🙄


")
")
")
")
")
")
")
")
")
")
")
")
")
")
")
")
")
")
")
")
")
")
")
")